Talking with 4 year-olds is a surefire way to bring more joy and laughter into your life! So here are some snippets of recent conversations I have had with my students.
Conversation 1 - All with the same student, but on different days
Student: Oh Mrs. McCord, I love your shirt! (Basic school spirit shirt, glad he likes it)
Student: Oh Mrs. McCord, I love your hair! (I had actually straightened my hair this day!).
Student: Oh Mrs. McCord, I love your shoes! (I was wearing my new TOMS, thanks for noticing!)
Student: Oh Mrs. McCord, I love your hair! (Now my hair was curly, apparently he loves it both ways)
Student: Oh Mrs. McCord, I love you shirt! (Different school spirit shirt, but apparently same great taste!)
Student: Oh Mrs. McCord, I love your hands!
Me: Thanks?!
*Need an ego boost? Stop by my classroom :-)
Conversation 2:
Student: My daddy's black.
Me: I know, I met him yesterday when he dropped you off at school.
Student: Yeah.
Me: My brothers and sister are black.
Student: Why?
*Uhhh, good question!
Conversation 3: Student is crying in the bathroom stall
Student (crying): Mrs. McCord! Mrs. McCord! My mommy taught my how to wipe, but I just keep wiping and wiping and it won't come clean!
*Man...I hate it when that happens!
Conversation 4:
Student (first thing she says when she sees me): Mrs. McCord! I have a baby in my mommy's tummy. But it won't come today.
Conversation 5:
Student: Mrs. McCord, I didn't tell you that I loved you today!
Me: Well that's ok, you just got here.
Student: Ok, I love you Mrs. McCord!
*It just doesn't get more genuine than that!
Unfortunately I've already forgotten a lot of the little, funny things that are said during the day. But I will try to write them down and share from time to time. Everyone needs a little freshness and honesty!
Praise God for our little children!
Wednesday, September 26, 2012
Tuesday, September 11, 2012
Bits and Pieces of Random
Ok, the school year has started up and as predicted, blogging has taken a slight downhill turn. But I'm now past the first few weeks, getting more settled in, not staying up at school until 6 or later, and so I have turned an eye back towards the blog - yay!
I know I promised a classroom reveal once it was updated. And I promise the room is ready! Hahaha...I would hope so anyways, kids have been coming for almost two and half weeks now. But I keep forgetting to take pictures while I'm up there! At the end of the day, I am working like crazy to clear my desk of the mess from the day and trying to get things ready for tomorrow. And somehow in there, taking pictures gets forgotten :-( Boo...but I will try my absolute best to remember this week :-)
It has been great to get back into the swing of Pre-K! I love it, and the great thing about Pre-K is that the year only gets better as time goes on because the kids get older, more independent, and learn our class routines. I have a lot of fun things we're doing that I want to share, and I am going to try to do a weekly post to accomplish that - so hold me accountable!
However, until I can remember to take my camera up to school...I'll share a little labor day fun! Scott and I actually both had the day off (yay!) and so we drove to a park about 15-20 minutes away from our house to go wading in Salado Creek. We had prepared ourselves for a busy crowd (being labor day and all), but surprisingly we actually had the place to ourselves. A family was there when we first arrived, so we let Link loose. Our 80 lb German Shepherd charged the family, barking ferociously and amazingly enough...they left!
Hahaha, ok not really! Although that might be effective, Link is too good-natured to do that. The family left (of their own accord) about 10 minutes after we arrived.
Here are some pictures of our day!
 Happy Labor Day!


We took a picnic lunch with us and enjoyed some chicken salad, grapes, and cookies. It was just a great low-key, very fun labor day, and we will definitely be going back to Salado creek!
And in closing...TCU had a GREAT game this past Saturday! Link was thoroughly riveted and did push-ups after every point. And since we won 56-0, you can just imagine he was wiped by the end! :-)

I know I promised a classroom reveal once it was updated. And I promise the room is ready! Hahaha...I would hope so anyways, kids have been coming for almost two and half weeks now. But I keep forgetting to take pictures while I'm up there! At the end of the day, I am working like crazy to clear my desk of the mess from the day and trying to get things ready for tomorrow. And somehow in there, taking pictures gets forgotten :-( Boo...but I will try my absolute best to remember this week :-)
It has been great to get back into the swing of Pre-K! I love it, and the great thing about Pre-K is that the year only gets better as time goes on because the kids get older, more independent, and learn our class routines. I have a lot of fun things we're doing that I want to share, and I am going to try to do a weekly post to accomplish that - so hold me accountable!
However, until I can remember to take my camera up to school...I'll share a little labor day fun! Scott and I actually both had the day off (yay!) and so we drove to a park about 15-20 minutes away from our house to go wading in Salado Creek. We had prepared ourselves for a busy crowd (being labor day and all), but surprisingly we actually had the place to ourselves. A family was there when we first arrived, so we let Link loose. Our 80 lb German Shepherd charged the family, barking ferociously and amazingly enough...they left!
Hahaha, ok not really! Although that might be effective, Link is too good-natured to do that. The family left (of their own accord) about 10 minutes after we arrived.
Here are some pictures of our day!


It was a beautiful day, with surprisingly cool weather! And Scott is being kind enough to hold my water bottle so I could take a picture :-) Although it may not look like it, the water is actually flowing pretty fast!

Link's first attempt at fishing!

We tried a family picture on self-timer in a fast-flowing river and my sandal stuck in the mud as I was running back. So...that's as far as I got :-)
We took a picnic lunch with us and enjoyed some chicken salad, grapes, and cookies. It was just a great low-key, very fun labor day, and we will definitely be going back to Salado creek!
And in closing...TCU had a GREAT game this past Saturday! Link was thoroughly riveted and did push-ups after every point. And since we won 56-0, you can just imagine he was wiped by the end! :-)

Thursday, August 16, 2012
Concentration Cream
The Benefits of Lotion in the Classroom!
So as I've been getting geared up for a new year to start and thinking about all the things to do, one of the million (I wish that was an exaggeration!) things that I'm getting ready is Concentration Cream. Well in Pre-K, it's Cranky Cream, but with my 3rd graders last year it was Concentration Cream.
I have been so blessed to work in districts that use Conscious Discipline - an amazing social/emotional curriculum that I think truly works to teach students social skills. If you haven't heard about it - look it up!!! Sorry, tangent, I'm back. Anyways, one of the things that is encouraged in a Conscious Discipline (CD) classroom is Concentration Cream. AND I LOVE IT!!! But more importantly, my students love it.
Here's what it is: a bottle of lotion (cheap is great!) from the grocery store with a piece of paper taped onto it that says "Concentration Cream" or "Cranky Cream" or any variation. It can be as cute or as simple as you'd like! Make sure it is lightly scented so that students want to breathe in deep to smell it. *IMPORTANT TIP* make sure it is a smell you like! Because they will use it, and your room will smell like it. And I made the mistake once of picking a lotion who's smell was not my favorite. Bad choice! Tossed it out within a few hours. So all that to say, make sure it's a smell that you enjoy :-)
In Pre-K, I use it with students who are cranky. We get our cranky cream and rub it into their hands. I'm building a connection with them, they get physical touch, and then when they breathe in the lotion, they are unknowingly taking deep breaths which disengages their stress response. It's amazing what helps a 4 year old snap out of a bad mood!
But I really want to talk about using it in the older grades (because sometimes people argue that this stuff is just for "little kids"). I introduced Concentration Cream to my 3rd grade class at the beginning of the year as special lotion that helps them to concentrate on their work. And after you rub it in, you have to breathe it in deeply for it to work (again "tricking" them into deep breathing). Did they all want to use it right away? Did they all try to play with it? Did they want to use it 20 times a day? Of course! But like anything in the classroom, you teach them how to use it and when the appropriate time is.
And of course in 3rd grade they are a little too cool to use it to concentrate. "Uhhh, Mrs. McCord - that's just lotion." So they just used it because they "didn't want to be ashy" obviously. Interesting then how everyone of them would stop to breathe the lotion in deep after they were done ;-)
I want to share two specific examples of why I think it is beneficial in the classroom.
Example 1: A student that I had was an extremely challenging student and would get frustrated very easily. When something got hard he would often throw his pencil or paper, or both, on the ground. So when I was working with him and I noticed his frustration levels rising, I would suggest that now is a great time to get some concentration cream. So he would stand up (increasing oxygen to his brain, awesome!), get a chance to walk away from the problem, and take breathe in that smell of the lotion (disengaging the stress response). And after awhile, he started doing it on his own when he would get frustrated during independent work. Concentration cream vs. pencils and papers thrown on the ground? Yes please!
Example 2: Another student was frequently teased about being ashy (dry skin on African-American people looks a little grey, hence the term ashy). His family didn't have lotion at home and he also had to get ready for school in the mornings by himself. So every day, he would come in first thing in the morning and ask to get some lotion. Yes, he was using it so he wouldn't be ashy, but did that help him concentrate? Absolutely! And as a teacher, it is my job to keep students safe. Safe physically and emotionally. And if a $2 bottle of lotion means that a kid is no longer being teased - I will absolutely keep that in my classroom!
Tuesday, August 7, 2012
Classroom Design on a Dime
Oh dear, school hasn't even started back up yet and I'm already slightly falling off the pace of blogging. But in my defense, school may not have officially started but I have been up there trying to get my classroom ready. So I thought I would share some before pics of my room and then in a few days (or at least definitely by Aug. 27th) I can share the after pics!
*Warning: the title of this post is not guaranteeing an HGTV-worthy "classroom reveal". But I can guarantee that it will be cheap!
So after having been in 3rd grade last year, I am moving back to Pre-K and am so excited! I just love those 4-year olds, they sure do spice up your life! Which means that I am also changing schools this year. I was able to get a glimpse into my new classroom at the very end of the school year in May and took these pictures.


Some things I'm loving: the big rugs already there, the manipulatives and goodies in all the cabinets and shelves, the furniture that's in there, and the white board with a Mimio
Some things I'm not loving: the chalkboard (haha, yes a real green chalkboard), the orange fabric hanging over the shelves along the wall, and the overall size of the room (it's a tad small...but that's not going to change and it really isn't too bad, so I'm over it!)
So hopefully fairly soon I will have an update for you and show you some of the changes I am making. I'll give you some hints: new curtains (hmmm, ok that's not so much a hint as just a dead giveaway), ways to turn chalkboards into streamlined, efficient educational tools, and some crazy organizational action going on!
Ok, I'm going to be honest, being outwardly organized has never been a super strong point of mine. I always know where everything is, I always get stuff done, and I'm usually prepared (or can wing it well). But I wouldn't say that someone else could walk into a work space of mine and understand where things went and how it worked. So one of my goals this school year is to avoid paper-clutter on my desk and have an outwardly sensible method of organization. Something pinterest-worthy of course! :-) Hahaha, and can I just say that if teachers made "new-school year resolutions" I have no doubt that 'reducing paper-clutter on desk' would be the number one resolution! So, let's see if it actually works this year!
Thursday, July 26, 2012
Diaper Babies!
I wanted to give diapers, but I wanted to jazz it up a little. And I have WAY too much free time on my hands to just wrap a package of diapers! So...I found some "pin-spiration." Unfortunately, the pin was just a picture with no website, so I can't give credit to the original creator, otherwise I would love to do so. Because this is not my original idea - oh to be that creative! But basically, I looked at the picture and then created my own version of it, and here it is!

It was really fun to make! And also allowed for the addition of other small, useful items into the mix. You can probably figure out what to do just by looking at the picture but then what would be the point of writing a blog?! Haha :-) So what follows are the steps that I took. Below is a picture of my supplies. These include: diapers of your choice, a basket, washcloths, socks, and various toiletries (I chose baby powder, Johnson's Baby Head-to-Toe Body Wash, Johnson's Baby Lotion, and Johnson's Baby Bedtime Lotion).


Next, take one of your washcloths and fold it into a triangle, and then fold the point of the triangle up to basically match the size of your diaper. I tried to demonstrate in the picture below.

Then, take your washcloth and wrap it around the diaper - much like you would a real baby! And use a safety pin to secure the washcloth. I just made sure the safety pin was in the back so that it wouldn't be noticeable when the babies were in the basket.

Now you need to keep these little babies heads warm! So take one of the socks and cover

Ok, the next step is the fun part! Adding eyes :-) I bought the adhesive googly eyes and just very lightly stuck them down. That way they could be taken off of the diaper and the diaper is still intact and useable.

I also thought it would be cute to make some babies sleeping. So I drew closed eyelids, however, I didn't want to draw on the actual diaper. So I took a piece of white paper and drew my closed eyelids on that (basically just half-circles), and then I folded the piece of paper and tucked it into the sock and washcloth and wrapped it around the back of the diaper. Unfortunately I forgot to take a picture of just this part - sorry! But you can see it in the finished pic.
And now for a few tips that tied it together. I padded the bottom of my basket with extra diapers and then covered that with tissue paper. I then stood diapers up in the back of the basket to give my babies something to rest upon. My socks came with six pairs, thus I had twelve socks but only six washcloths. So I just placed those extra socks in the basket as well. Add in your toiletries and there you have it!!! And just to note, I bought a 50 pack of diapers and I was only able to fit 25 in this gift (with stuffing the bottom and lining the back) so I just tied some ribbon around the rest of the pack of diapers and gave it all together.
*Unexpected bonus! My friend who I gave this to has a little girl who's about a year and a half and apparently she had fun playing with the babies like dolls :-) So it's a gift for now and later! Hahaha :-)
I hope you enjoy! I thought it was adorable, and I just wish I knew where the idea originally came from so I could give that person credit. Because although I can put it together, I would NEVER have been able to come up with the idea on my own! But hey...that's what Pinterest is all about right?!
Friday, July 20, 2012
Oh, Seasons!
So I am currently working on different projects that I want to blog about. However, the most epic race ever has gotten slightly in the way of progress. That's right, the Tour de France! Every July I'm glued to NBC sports network for three weeks as I ride my way through France - ok as I watch others ride their way through France. 198 riders cycling their way through thousand of kilometers, over some of the steepest mountains in the alps and the pyrenees, working together in an amazing example of teamwork and sportmanship - it's amazing! So all that to say, watch the Tour!!!
Ok, no really, all that to say, I'm just going to share one of my funniest/classic moments teaching Pre-K. And I will start by mentioning that if you want to spice up your life and you have access to young children, just ask some questions. You never know what you're going to get! It was the end of September or the beginning of October (not this most recent school year, but the one before) right around when fall had begun. We were doing a unit in the classroom on fall and we were studying how the earth changes, we were "Going on a Leaf Hunt," and all sorts of fun adventures! However, I realized that I needed to make sure my kids knew what the word "season" meant. It would do no good to talk about seasons and fall/autumn if they didn't have that vocabulary.
So during circle time, I posed this question, "Can somebody tell me what a season is?"
First student answers: "Oh yeah, it's like the thing that you pour. Like you pour into soups and stuff."
Me: "Hmm, ok yes, those are seasonings and you're right, you can use seasonings to flavor food. The word season can also mean something else, does anybody know?"
And before I share with you my second answer of the day, let me give you a little background on the next student, we'll call him Joe. Joe is a precious, hilarious, "all-boy" kind of boy. He wore cowboy boots to school EVERY day. He would spontaneously, and by request, sing you songs such as "Big Green Tractor" and "Rain is a Good Thing." And on the way to a field trip he was able to identify two places - his church and the gun store (Gander Mountain). So Joe was a constant source of entertainment and delight. And he was COUNTRY, and I don't mean a little country!
So back to the seasons. Joe now raises his hand.
Joe: "Uh yeah, it's like where you have a gun and you go into a field, and there's different seasons. Like dove season and deer season and turkeys!"
Why yes! That is actually exactly what I meant! Teaching in Texas...there just really isn't anything like it :-)
Monday, July 16, 2012
T-Shirt Transformations
Summer is without a doubt my favorite season of the year. I have always loved summer! I love relaxing by pools, lakes, or beaches, I love the heat (most days), I love having no school (as a student and as a teacher), and my birthday is in the summer! At least in the Northern Hemisphere anyways... :-)
However, summer brings with it the inevitable boredom of some days. Enter Pinterest! Or as my husband so fondly refers to it "fantasy football for girls." Which probably isn't so far off the mark! And for my friends on facebook - I apologize for the repeat of several pictures. So my starting line-up from pinterest will be my t-shirt transformations. More specifically, a t-shirt into a tank top and a t-shirt headband.
This probably started as a conversation between my mom and I where we lamenting the high-necked collars of t-shirts. She was complaining about the collars of t-shirts and how it bugs her, and I laughed at her slightly obsessive comments only to realize that as she was talking, I too was pulling on the neck of my shirt. In fact, every one of my shirts is distinctly stretched at the neck from my constant tugging. Hmmm...something about the apple and the tree?! So my mom has been giving some of her t-shirts to my grandma (who recently moved close to them, yay!) and Grandma has been converting them into v-necked collars. Can I say LOVE!?! That too is on my list of t-shirt projects, but until I can go visit my grandma for a tutorial, I had to make do with turning a t-shirt into a tank top.
Pinterest saves the day! I found a tutorial from crafterhours that gave excellent step-by-step instructions for the whole process. So if you're interested and want more explanation than I give, go check it out - very helpful! It was a really simple process that took me 30 minutes from start-to-finish. Which included trying to figure it out along the way, so it really was quick. Although, I had a sewing machine which definitely speeds up the process!
I took an old shirt that I no longer wear (in case it didn't work out!) and began cutting.
Before

After

It worked! And is now a LOT more comfortable! So with a little more confidence, I picked a shirt that I still enjoy wearing and tried again. This time taking pictures along the way :-)
 Here is the shirt before I started. Note my dog, Link's paw in the bottom right corner. He just loves to help out with Pinterest projects!
 First cut off the sleeves along the inside seam. Then cut a straight line across the top, just underneath the collar. Now, below is where I started the sewing part.
 I folded the top edge over and pinned it. Then used my sewing machine to sew a straight seam. I made the seam about a half-inch wide. For the next step, I didn't take a picture, but I cut off the bottom seam of the t-shirt and then used that as the straps for the tank top.
 You have to thread the strap through the seam, so I attached a safety pin to the end of the strap in order to give me something solid to hold onto. And here's the finished product!

And like I mentioned, the original blog that I linked to has a WAY more detailed step-by-step process, so if you're wanting to make one, go check that out for sure! Hahaha, it'll be a lot easier to follow than my half instructions :-)
And when Scott recently got an ink stain on one of his undershirts, I was provided with the material for my second t-shirt project! Oh gee, Scott, I'm sorry about your shirt! But here's my new t-shirt headband ;-) The tutorial for this project can be found here, from the blog Julie Ann Art.


I cut his undershirt into five horizontal strips, and then sewed them together at one end. I then began a five-strand braid. Which is explained really well, with pictures, in the blog tutorial that I linked to. After braiding a sufficient length to wrap around my head, I attached the two ends together, and there you have it! Extremely comfortable and very handy! Just think of all the fun colors you could use from shirts. Now I just need to wait for more to be ruined...
So thanks to my Pinterest first-round draft picks, I now have two t-shirts turned comfortable tank tops and a headband! Next up for t-shirts...a t-shirt quilt. And I promise to share my progress as I go along!
However, summer brings with it the inevitable boredom of some days. Enter Pinterest! Or as my husband so fondly refers to it "fantasy football for girls." Which probably isn't so far off the mark! And for my friends on facebook - I apologize for the repeat of several pictures. So my starting line-up from pinterest will be my t-shirt transformations. More specifically, a t-shirt into a tank top and a t-shirt headband.
This probably started as a conversation between my mom and I where we lamenting the high-necked collars of t-shirts. She was complaining about the collars of t-shirts and how it bugs her, and I laughed at her slightly obsessive comments only to realize that as she was talking, I too was pulling on the neck of my shirt. In fact, every one of my shirts is distinctly stretched at the neck from my constant tugging. Hmmm...something about the apple and the tree?! So my mom has been giving some of her t-shirts to my grandma (who recently moved close to them, yay!) and Grandma has been converting them into v-necked collars. Can I say LOVE!?! That too is on my list of t-shirt projects, but until I can go visit my grandma for a tutorial, I had to make do with turning a t-shirt into a tank top.
Pinterest saves the day! I found a tutorial from crafterhours that gave excellent step-by-step instructions for the whole process. So if you're interested and want more explanation than I give, go check it out - very helpful! It was a really simple process that took me 30 minutes from start-to-finish. Which included trying to figure it out along the way, so it really was quick. Although, I had a sewing machine which definitely speeds up the process!
I took an old shirt that I no longer wear (in case it didn't work out!) and began cutting.
Before

After

It worked! And is now a LOT more comfortable! So with a little more confidence, I picked a shirt that I still enjoy wearing and tried again. This time taking pictures along the way :-)


And like I mentioned, the original blog that I linked to has a WAY more detailed step-by-step process, so if you're wanting to make one, go check that out for sure! Hahaha, it'll be a lot easier to follow than my half instructions :-)
And when Scott recently got an ink stain on one of his undershirts, I was provided with the material for my second t-shirt project! Oh gee, Scott, I'm sorry about your shirt! But here's my new t-shirt headband ;-) The tutorial for this project can be found here, from the blog Julie Ann Art.


I cut his undershirt into five horizontal strips, and then sewed them together at one end. I then began a five-strand braid. Which is explained really well, with pictures, in the blog tutorial that I linked to. After braiding a sufficient length to wrap around my head, I attached the two ends together, and there you have it! Extremely comfortable and very handy! Just think of all the fun colors you could use from shirts. Now I just need to wait for more to be ruined...
So thanks to my Pinterest first-round draft picks, I now have two t-shirts turned comfortable tank tops and a headband! Next up for t-shirts...a t-shirt quilt. And I promise to share my progress as I go along!
Thursday, July 12, 2012
Our not so friendly guests...
So Scott and I are blessed to live in a great duplex with a wonderful dog, great neighbors, and lots of fun people who periodically stay with us when they rotate through temple. However, recently we had so not so friendly guests...
It started out small and innocent as most things do in life. I walked outside a few weeks ago and saw...a wasp. Definitely not my favorite, but also not something I would panic about. "Hmm...oh well," is what I'm pretty sure ran through my head. I also noticed what looked like the stem of a nest starting. "Oh, I guess I need to get a broom and knock that down before it gets bigger." I actually gave this advice to myself - if only I had followed it immediately.
Now fast forward about a week. I was selling something on Craigslist and the person was coming to pick up the item. Gotta love selling stuff you don't use and getting money right?! But there's always that slightly nervous tension when you have a complete stranger coming to your house to exchange money and items. So the lady pulls up, walks to the door and knocks. After wrangling our 80 lb German Shepherd back from the door, I open up to find a lady - looking slightly panicked and standing about 10 feet back from the door. I was a little confused as the dog was safely hidden and I was only selling Nintendo Wii Wheels.
I start to hand to them to her and she says "Do you know that you have wasps out here?"
Without looking up, I just laugh it off, "Hahaha oh yeah. I saw that, I'm planning on getting rid of it soon."
She gives me a look that clearly says "You're CRAZY!', shoves the money in my hands and takes the wheels. At this point it starts to dawn on me that perhaps I should look up. When I do I see this:
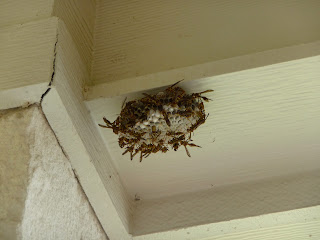
What was once a harmless wasp flying around has now become a thriving, wiggling, crawling mess of a hive. (Please note all the white egg sacs that indicate further wasps waiting to be born) It's probably a good thing that people don't leave reviews for sellers on Craigslist.
So another week passes by where Scott and I look up at the roof each time we walk into the house and say "Man! We really need to do something about that!" Hmm...this advice sounds familiar. So naturally I ignore it! A week later, I see this on the other side of the overhang:

Yep, should have learned the first time! Because note the second nest forming, as well as an additional third nest just beginning in the bottom left-hand corner. Our small town may not be much of a hotspot for humans, but apparently it is the place to be if you are a wasp!
So this time, I actually heeded my own advice (never to late to learn) and got out my Beekeepers' outfit. Something I highly suggest that everyone should own.

Featuring: Thick TCU sweatshirt (Go Frogs!) with a hood, rubber dishwashing gloves, white mesh face cover, blue jeans (not pictured), cowboy boots (not pictured)
And let me clarify, contrary to what my husband believed, no that is not my wedding veil! Just plain old white tulle. And to complete the ensemble:


So to summarize...SUCCESS! Although in hindsight, it probably would have been a lot easier to just knock down the start of a nest and kill one wasp.
And since I'm sure my fellow Hunger Games fans were probably concerned about this...at least they weren't Tracker Jackers!!!
It started out small and innocent as most things do in life. I walked outside a few weeks ago and saw...a wasp. Definitely not my favorite, but also not something I would panic about. "Hmm...oh well," is what I'm pretty sure ran through my head. I also noticed what looked like the stem of a nest starting. "Oh, I guess I need to get a broom and knock that down before it gets bigger." I actually gave this advice to myself - if only I had followed it immediately.
Now fast forward about a week. I was selling something on Craigslist and the person was coming to pick up the item. Gotta love selling stuff you don't use and getting money right?! But there's always that slightly nervous tension when you have a complete stranger coming to your house to exchange money and items. So the lady pulls up, walks to the door and knocks. After wrangling our 80 lb German Shepherd back from the door, I open up to find a lady - looking slightly panicked and standing about 10 feet back from the door. I was a little confused as the dog was safely hidden and I was only selling Nintendo Wii Wheels.
I start to hand to them to her and she says "Do you know that you have wasps out here?"
Without looking up, I just laugh it off, "Hahaha oh yeah. I saw that, I'm planning on getting rid of it soon."
She gives me a look that clearly says "You're CRAZY!', shoves the money in my hands and takes the wheels. At this point it starts to dawn on me that perhaps I should look up. When I do I see this:

What was once a harmless wasp flying around has now become a thriving, wiggling, crawling mess of a hive. (Please note all the white egg sacs that indicate further wasps waiting to be born) It's probably a good thing that people don't leave reviews for sellers on Craigslist.
So another week passes by where Scott and I look up at the roof each time we walk into the house and say "Man! We really need to do something about that!" Hmm...this advice sounds familiar. So naturally I ignore it! A week later, I see this on the other side of the overhang:

Yep, should have learned the first time! Because note the second nest forming, as well as an additional third nest just beginning in the bottom left-hand corner. Our small town may not be much of a hotspot for humans, but apparently it is the place to be if you are a wasp!
So this time, I actually heeded my own advice (never to late to learn) and got out my Beekeepers' outfit. Something I highly suggest that everyone should own.

Featuring: Thick TCU sweatshirt (Go Frogs!) with a hood, rubber dishwashing gloves, white mesh face cover, blue jeans (not pictured), cowboy boots (not pictured)
And let me clarify, contrary to what my husband believed, no that is not my wedding veil! Just plain old white tulle. And to complete the ensemble:
Wasp and Hornet Killer from Home Depot. Actual helpful hint here: buy
the foaming kind! One of our friends recommended this to us because the
foam weighs down the wasps and kills them instantly, thus hindering
their ability to attack you. Another helpful hint: if you have potted
flowers and fresh herbs under your nests move those BEFORE spraying.
Wish I'd thought of that one...so much for our basil and parsley.


So to summarize...SUCCESS! Although in hindsight, it probably would have been a lot easier to just knock down the start of a nest and kill one wasp.
And since I'm sure my fellow Hunger Games fans were probably concerned about this...at least they weren't Tracker Jackers!!!
Tuesday, July 10, 2012
If I had a blog...
"Well, if I had a blog - this would go on it." Since the summer has started I've said those exact words to my dear, sweet husband countless times. Enough times in fact to warrant the start of this blog - mostly so that he doesn't have to hear it anymore!
I've often toyed with the idea of starting a blog. But I held back for the same reasons everyone quotes...what will I say, will it be worth reading, what will I write about? No one will read it, I won't have time to keep up with it, etc. etc. However! I'm a teacher. And in being a teacher, I have three glorious months in the summer torecover from the patience, love, and frustration that I pour into my students relax and actually have free time.
So here I am...starting a blog! I make no promises as to how often I will post, and I have no set theme or topic that I'll be writing about. But I like to craft, cook, scrapbook, hang out with friends, and ultimately try and bring glory to God in what I do. And if all else fails, I am a teacher so my students provide me with a never-ending supply of funny/crazy moments!
So for my first post I'm going to leave you with one of these such moments. I taught Pre-K my first two years and will be teaching it again next year. However, this last year, I taught 3rd grade and wow...what a difference! To give a little background, my school had a very high number of economically disadvantaged (I believe 96% of our students were on free or reduced lunch). Our population was mostly Hispanic and African-American students. And let me say that I love this type of school. My heart is truly for at-risk students, and it is why I became a teacher. I love being a stable, consistent person for my students that they can count on to love them and support them. Our school also has a lot of blended families - perfect, I fit right in! So on the first day of school, I like to get to know my students. I try to learn about their lives and I share about mine. In doing so, I shared this picture with my class:

To which the following conversation ensues:
Boy student: "Uhhh Mrs. McCord? Is all your family white?
Me: "No actually they're not. My brothers and sister are black."
Girl student (real matter of fact): "Y'all got different daddies?"
I've often toyed with the idea of starting a blog. But I held back for the same reasons everyone quotes...what will I say, will it be worth reading, what will I write about? No one will read it, I won't have time to keep up with it, etc. etc. However! I'm a teacher. And in being a teacher, I have three glorious months in the summer to
So here I am...starting a blog! I make no promises as to how often I will post, and I have no set theme or topic that I'll be writing about. But I like to craft, cook, scrapbook, hang out with friends, and ultimately try and bring glory to God in what I do. And if all else fails, I am a teacher so my students provide me with a never-ending supply of funny/crazy moments!
So for my first post I'm going to leave you with one of these such moments. I taught Pre-K my first two years and will be teaching it again next year. However, this last year, I taught 3rd grade and wow...what a difference! To give a little background, my school had a very high number of economically disadvantaged (I believe 96% of our students were on free or reduced lunch). Our population was mostly Hispanic and African-American students. And let me say that I love this type of school. My heart is truly for at-risk students, and it is why I became a teacher. I love being a stable, consistent person for my students that they can count on to love them and support them. Our school also has a lot of blended families - perfect, I fit right in! So on the first day of school, I like to get to know my students. I try to learn about their lives and I share about mine. In doing so, I shared this picture with my class:

To which the following conversation ensues:
Boy student: "Uhhh Mrs. McCord? Is all your family white?
Me: "No actually they're not. My brothers and sister are black."
Girl student (real matter of fact): "Y'all got different daddies?"
Subscribe to:
Comments (Atom)